In late 2024, we decided to fork the Tailscale application to make it easier for Above customers to connect to the Above VPN service. We have published the Above VPN app on our F-Droid repository.
PLEASE NOTE: The Above VPN app works for Above Suite customers only. In order to use the Above VPN app you will need to completely uninstall Tailscale from your phone. Remember to uninstall it from secondary profiles as well, otherwise you may encounter issues.
Now, if you bought your phone before November 2024, please scroll to the preparation steps first to prepare your phone for the new Above VPN app!
Using Above VPN
Follow these steps with the newly released 'Above VPN' app (purple shield icon).
Step 1. After Above VPN is installed, tap the OPEN button in F-Droid or launch the app with the purple shield icon from your home screen / app drawer (swipe up from home screen).
Step 2. On the main screen, tap the "Get Started" button
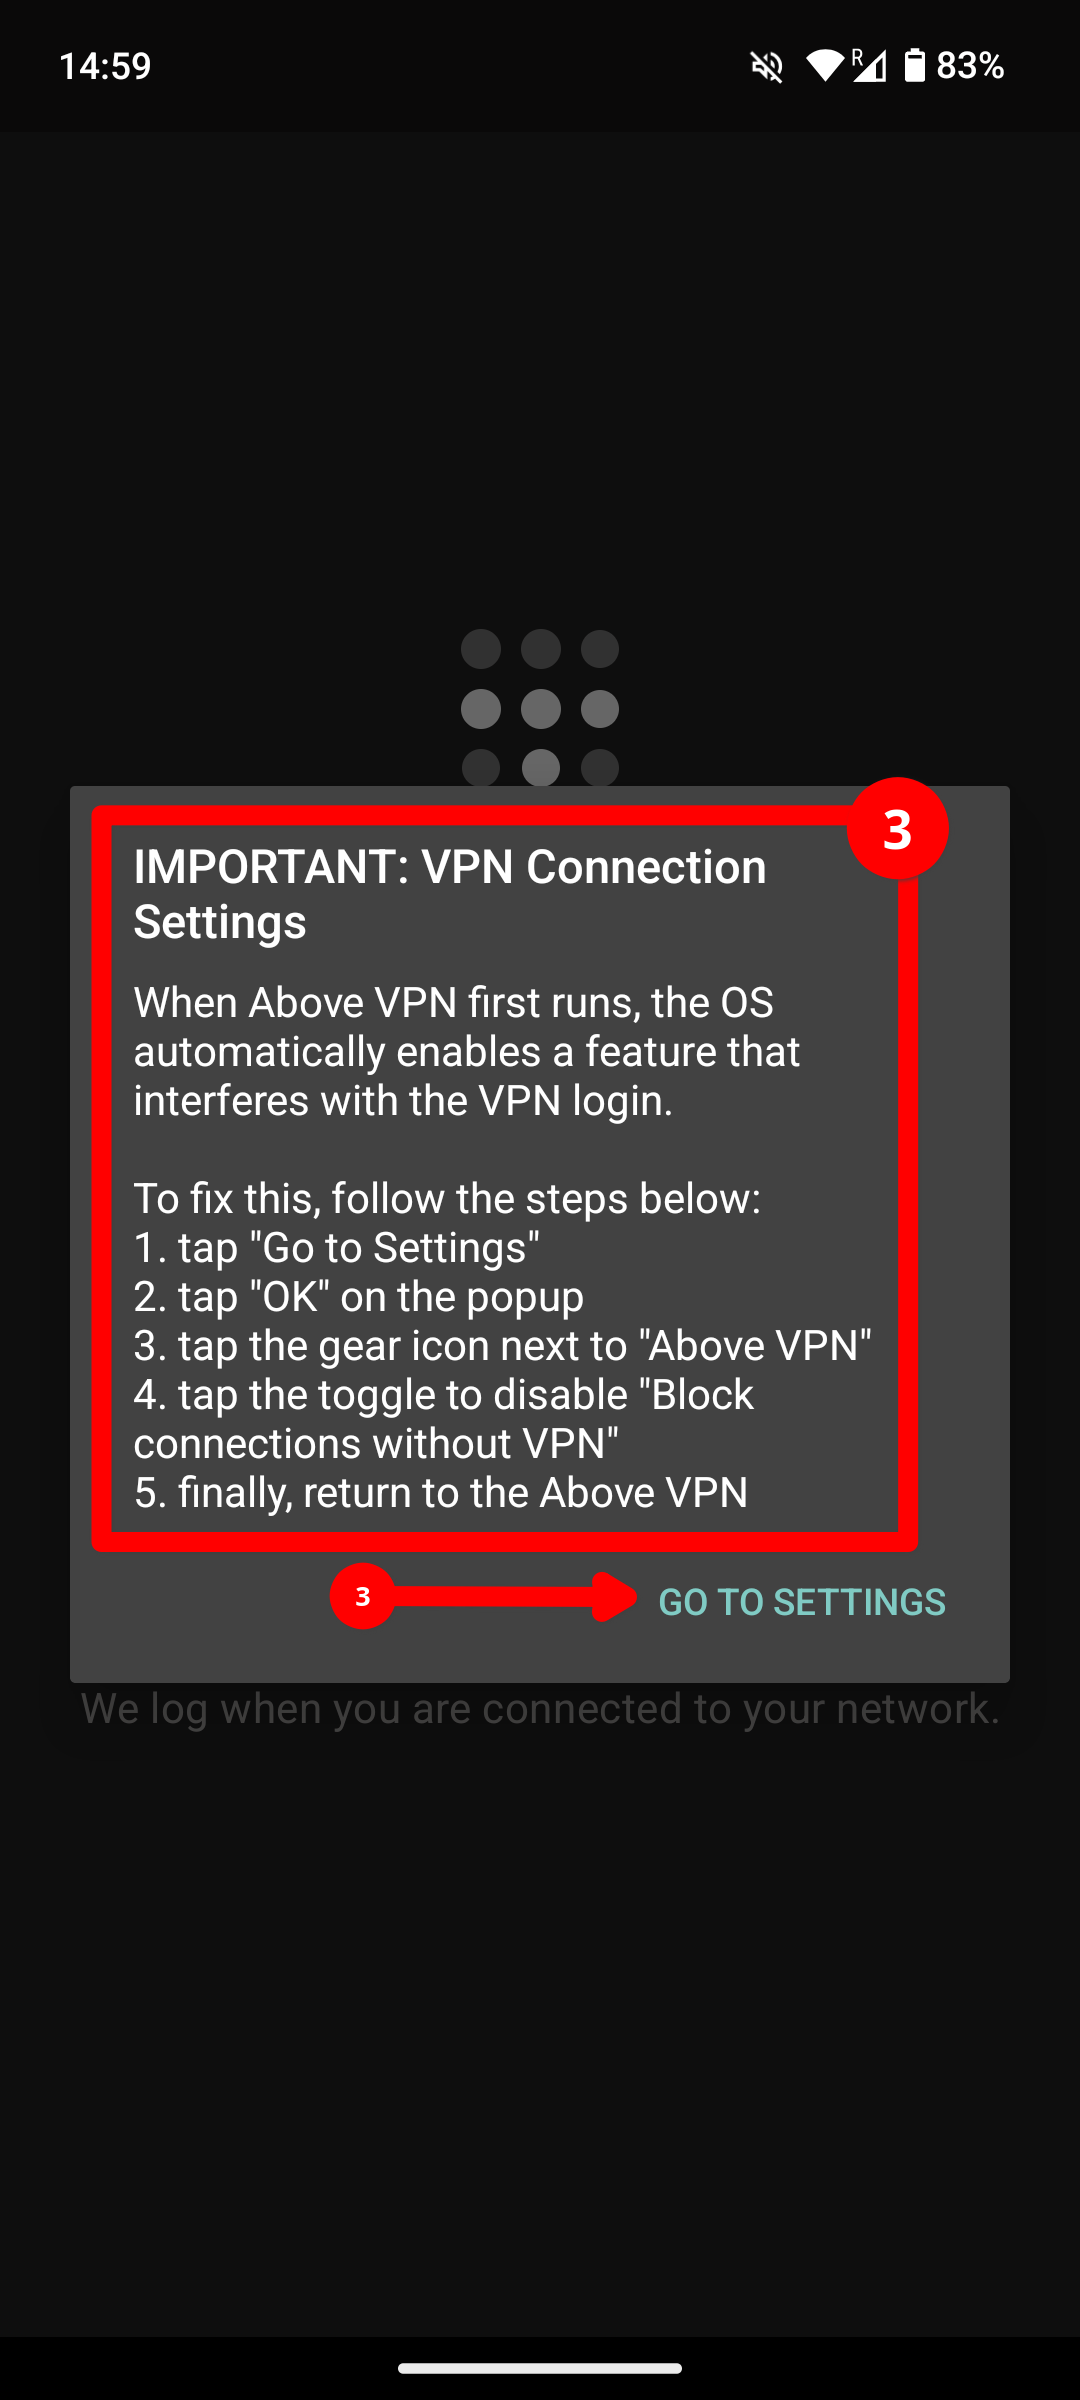
Step 3. Read the VPN connections setting popup and follow the next steps, tap "Go To Settings"
Step 4. Accept the connection request from Above VPN by hitting OK
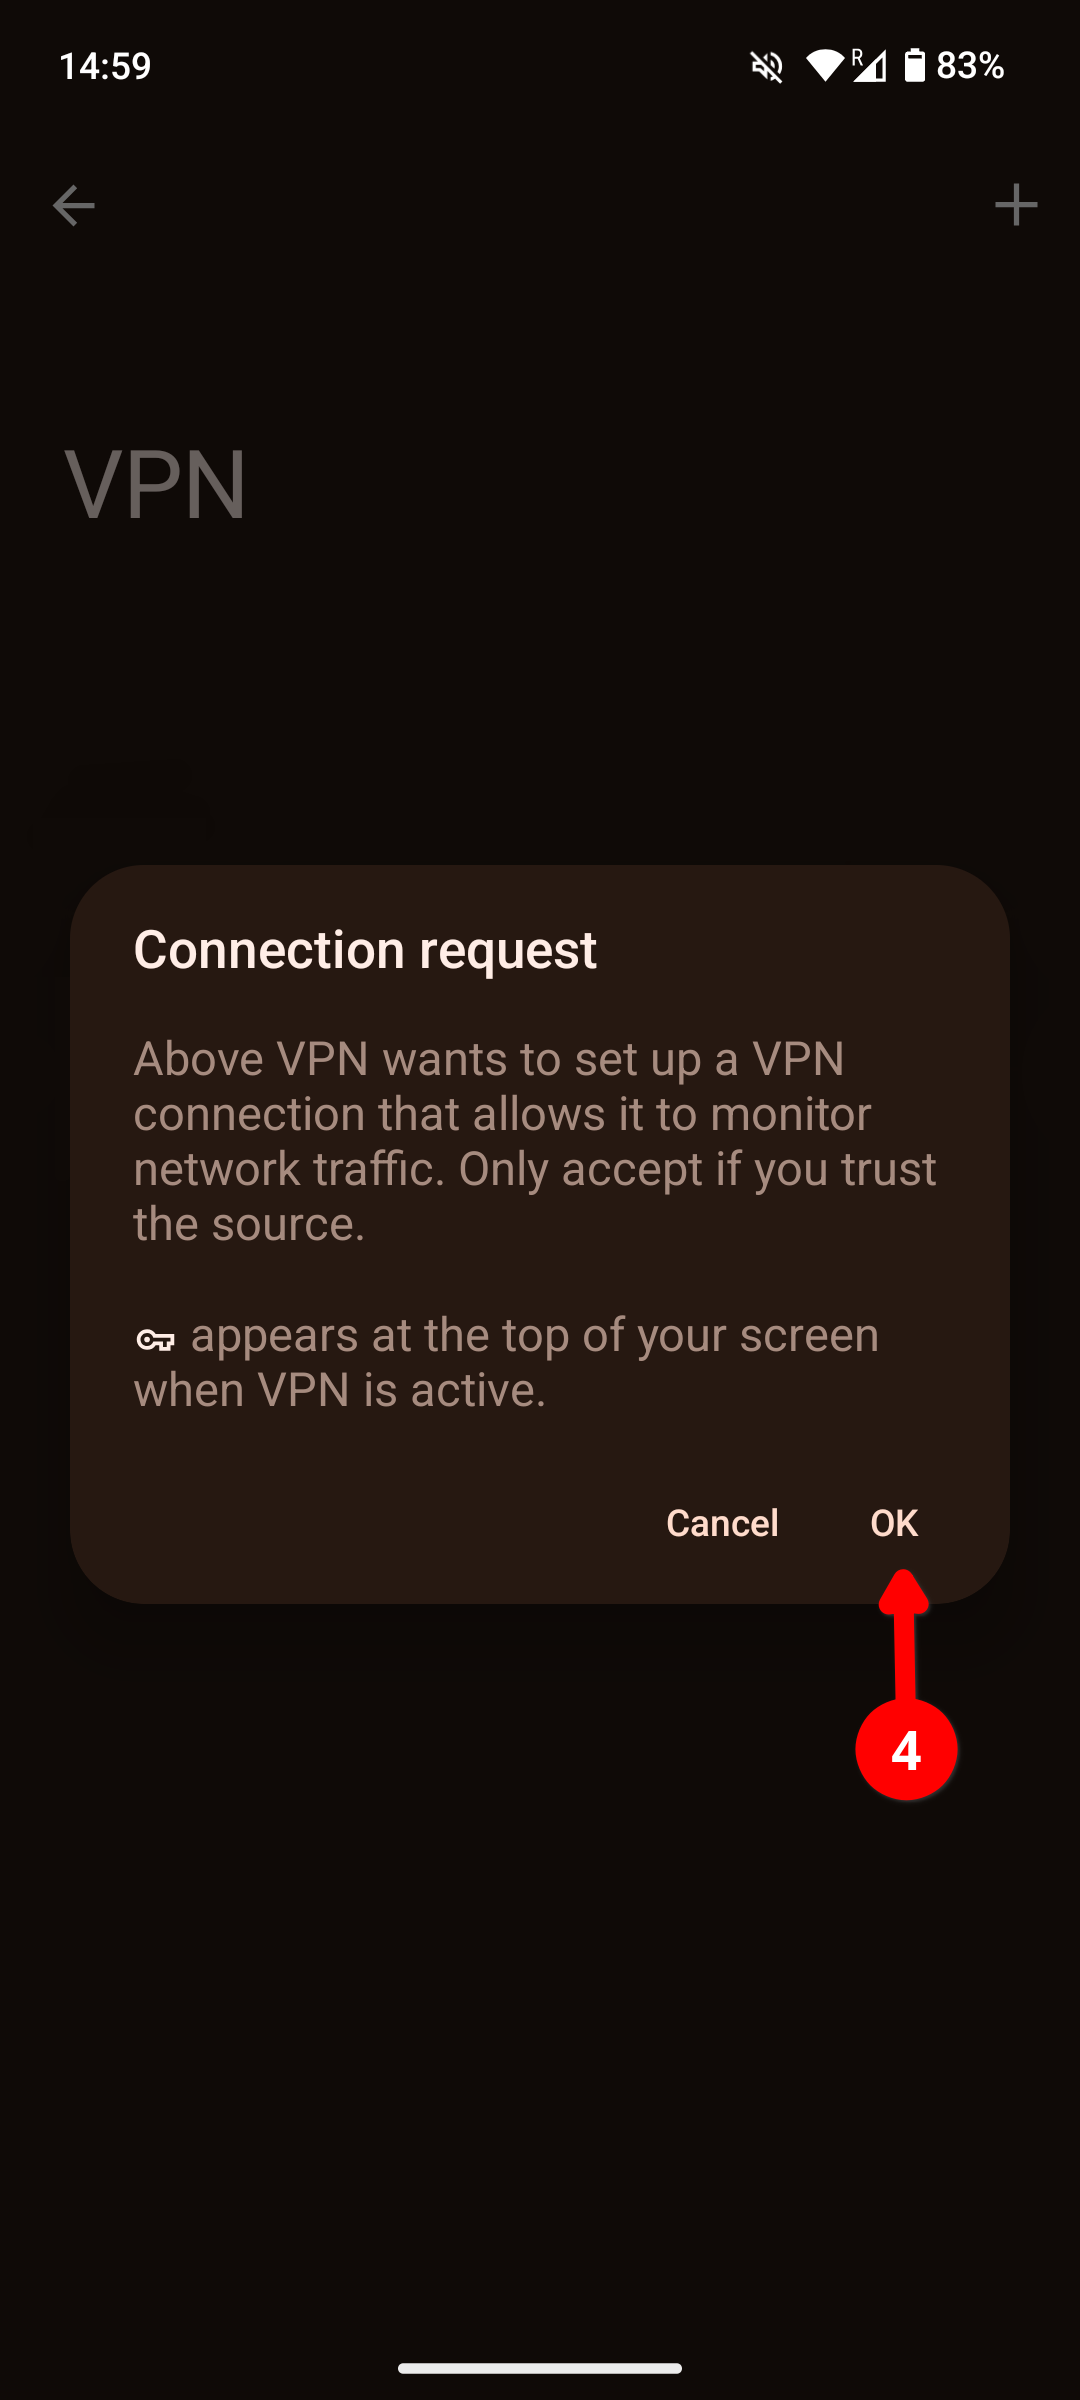
Note: The 'Connection request' prompt will set this new VPN connection as the phones default for all internet traffic. Once we push OK, it will enable the 'Block connections for VPN' setting for it, which means that all connections that try to go around the VPN will be blocked - this is a powerful feature to effectively prevent VPN leaks.
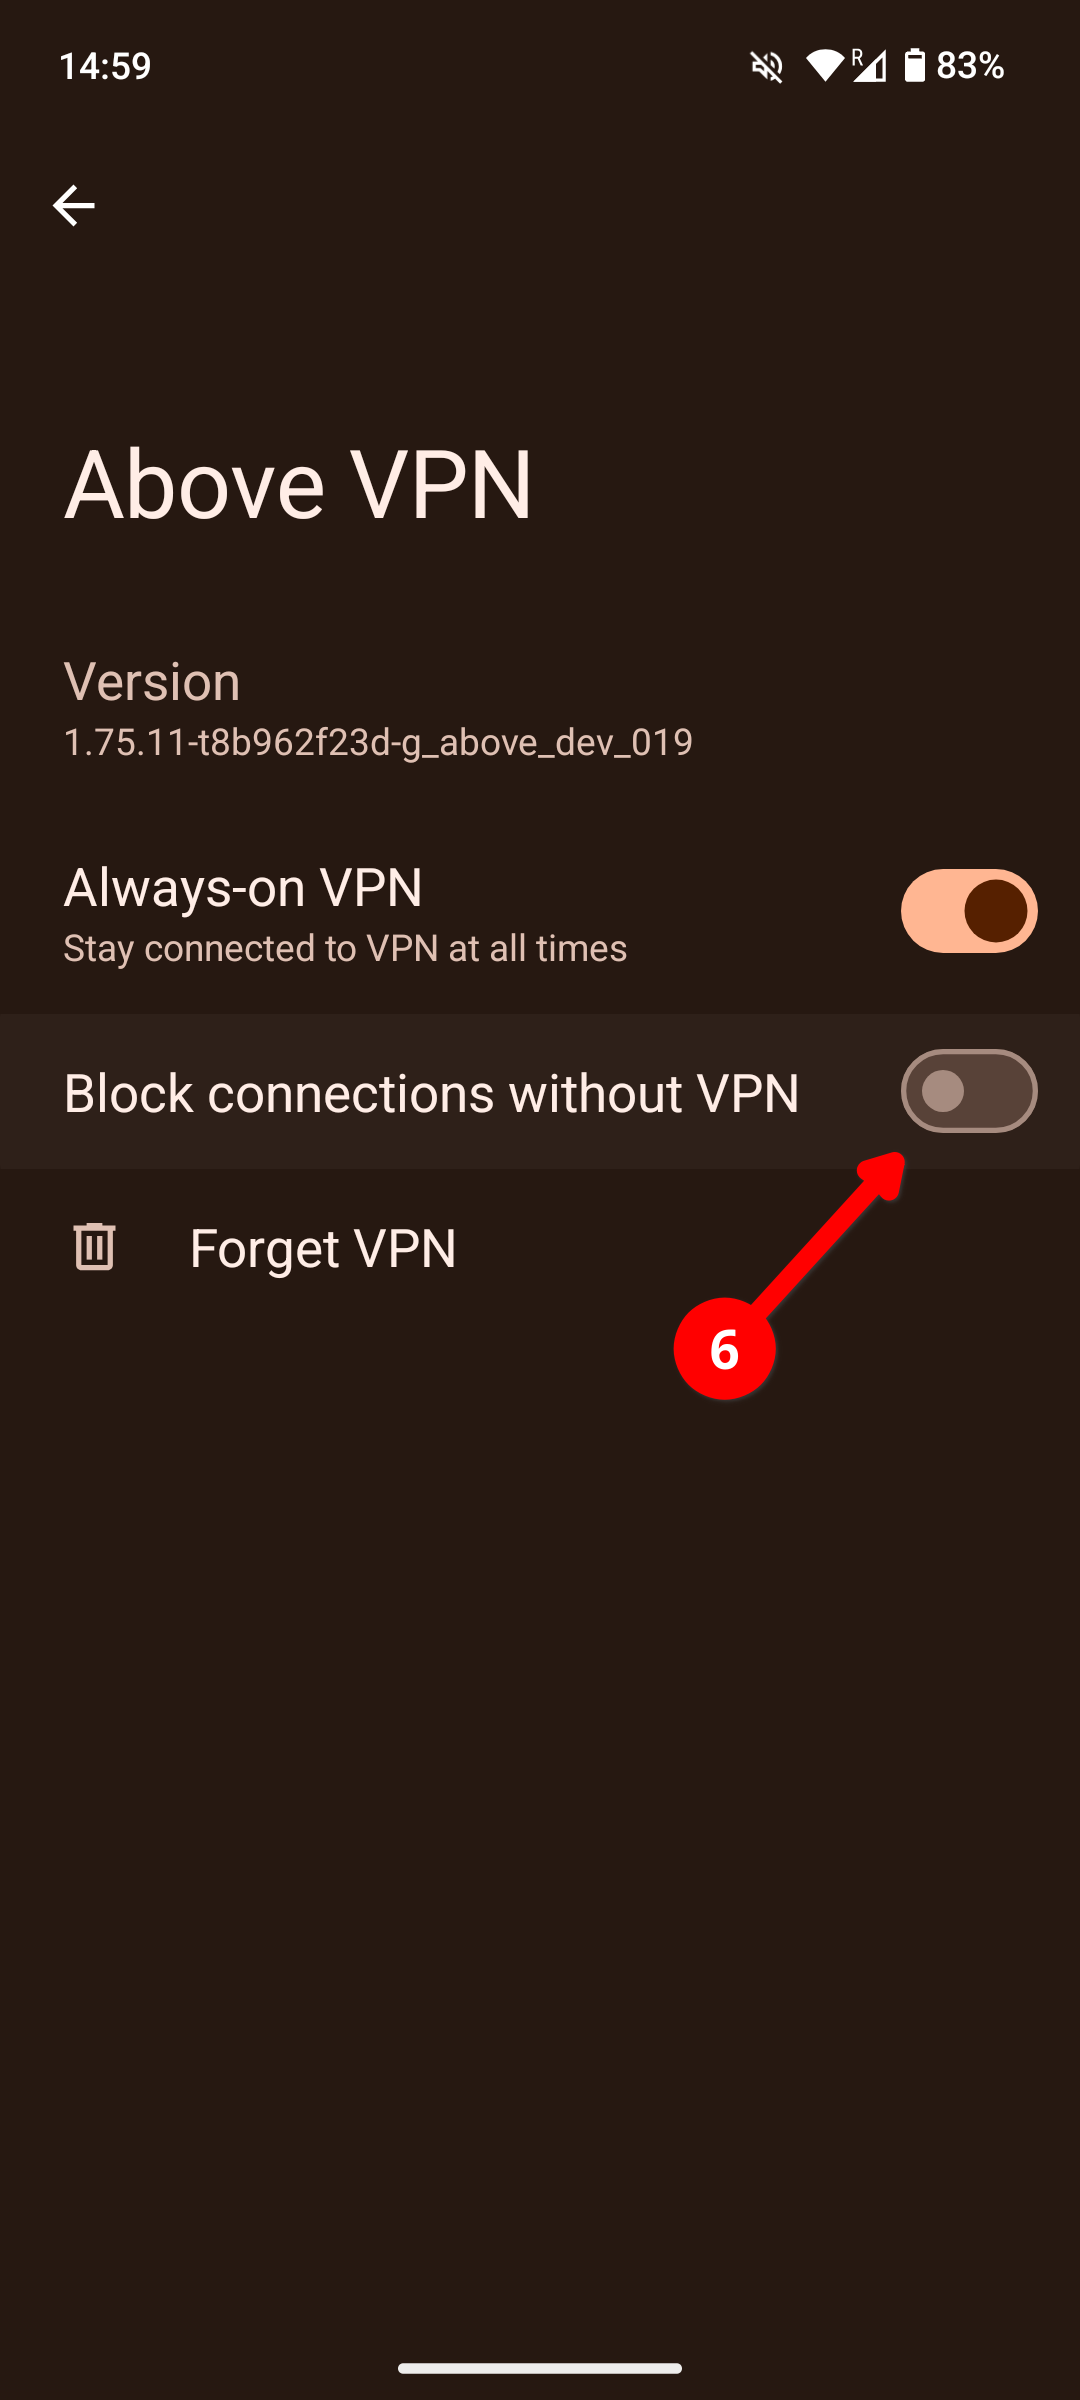
For Above VPN the 'Block connections without VPN' setting needs to be turned off temporarily whenever we need to log in to the VPN itself in order to finish the setup. Once set up, this setting can be turned on again to prevent VPN leaks.
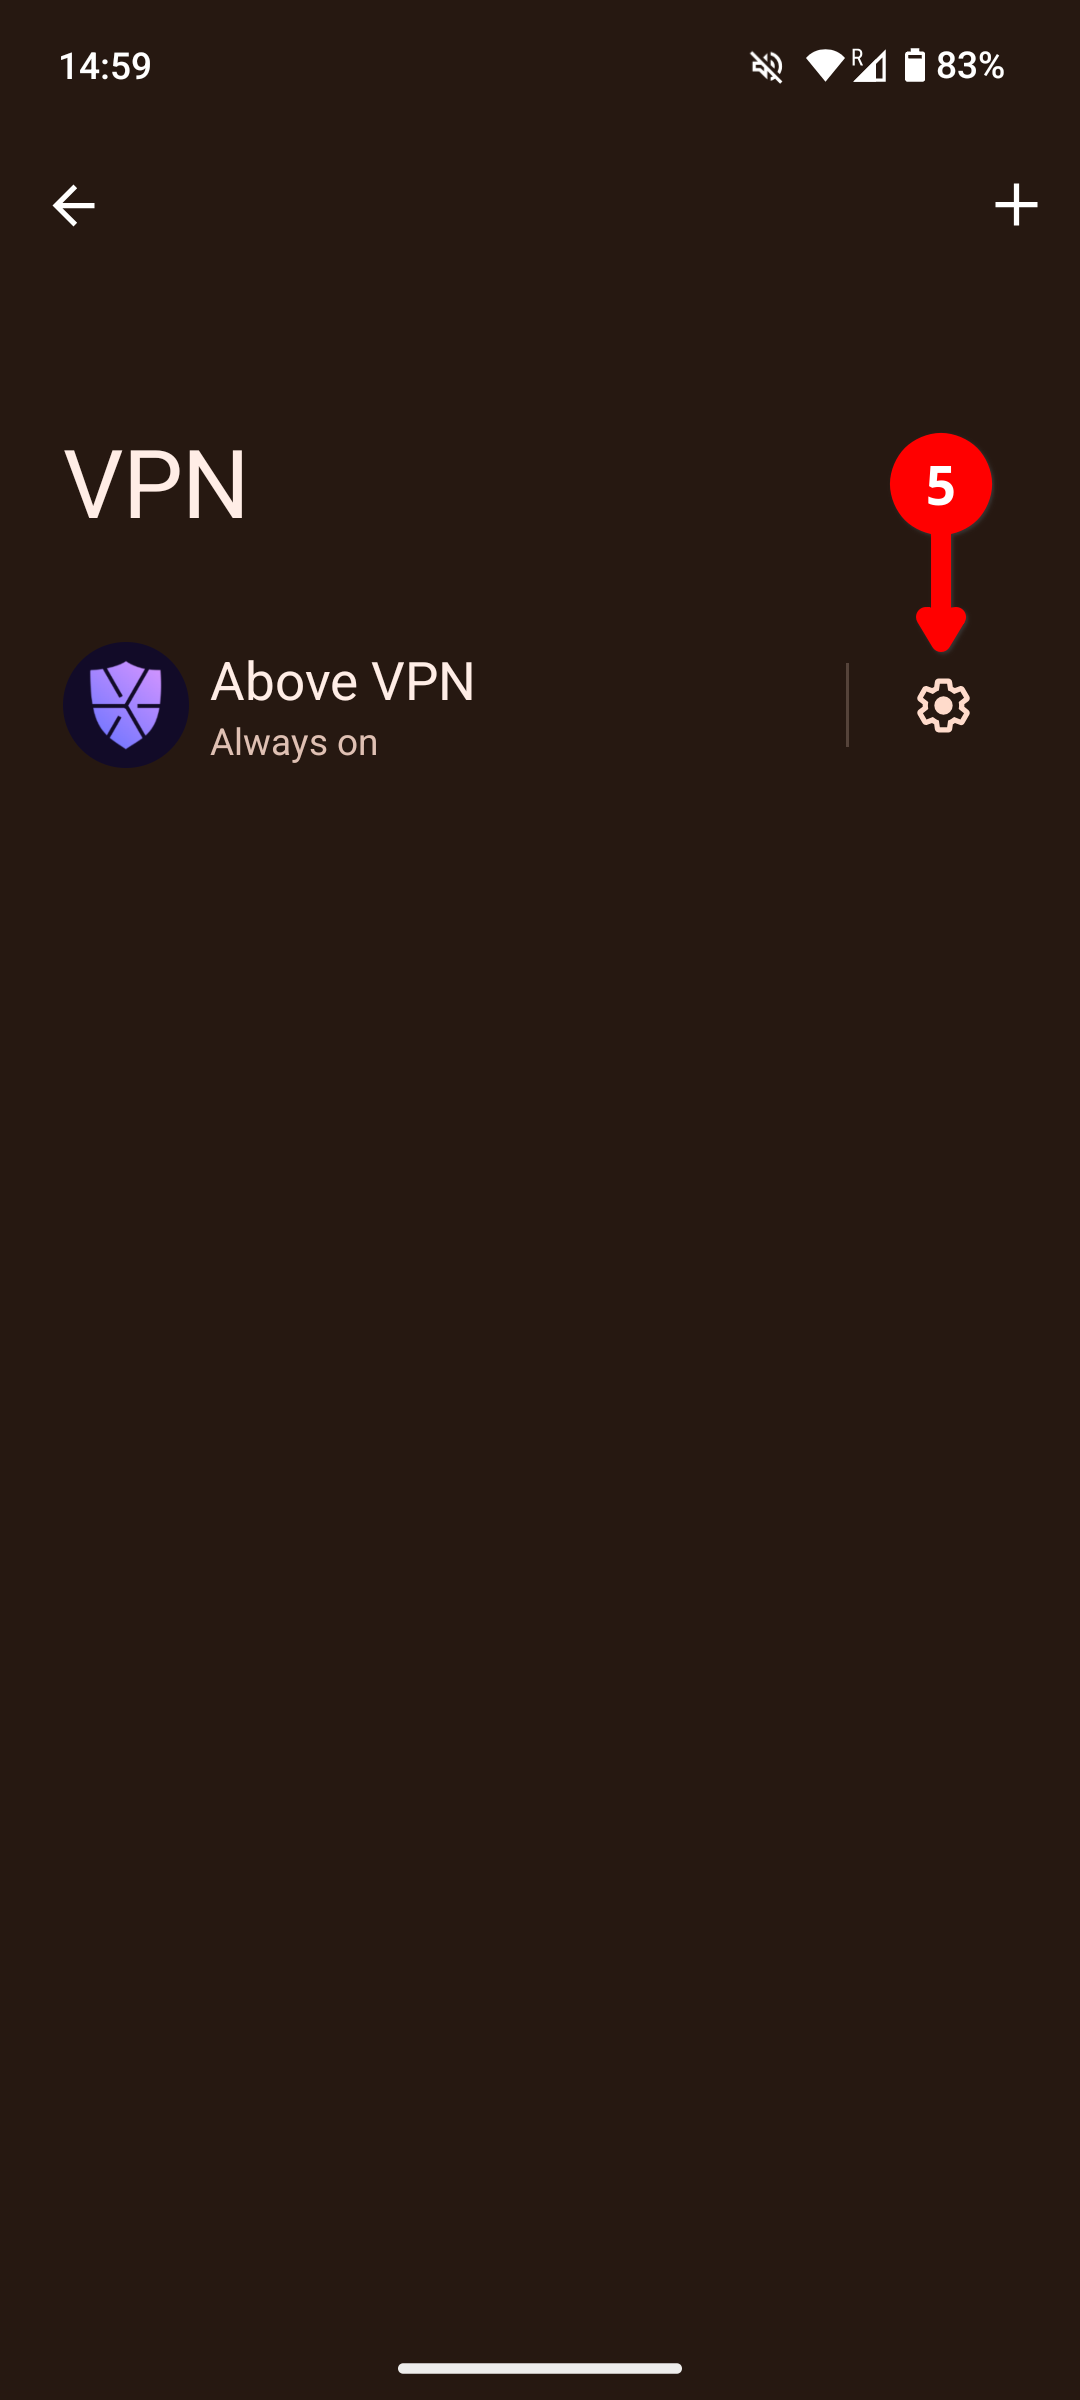
Step 5. Tap the gear ⚙️ icon next to Above VPN in the list.
Step 6. Toggle off the "Block connections without VPN" (you can turn it back on later)
Note: When the switch is flipped to the left and is greyed out, it means it is toggled off.
See the picture below for comparison.
Step 7. Push on the back arrow twice (upper left) to get back to the main Above VPN page (you will see "Welcome to Above VPN")
Step 8. Hit the blue "Log In" button. You will now be redirected to the Above Suite login page via web browser.
Step 9. Wait for the page to load, then log in with your Above Suite credentials (if you have logged in previously it'll happen automatically)
Note: For the username, just enter your plain username without any domain added. The 2FA field can just stay empty.
Step 10. You should be directed a confirmation that your login worked - scroll down and tap on the blue "Continue" button - wait a moment until you'll be taken back to the app.
Then, tap "Allow" on the notifications permission popup.
Step 11. Look for Exit Node towards the top (it says 'None' by default). Tap on that section and in the dropdown and select which server you'd like to use.
Once you have an exit node selected, this section will light up blue.
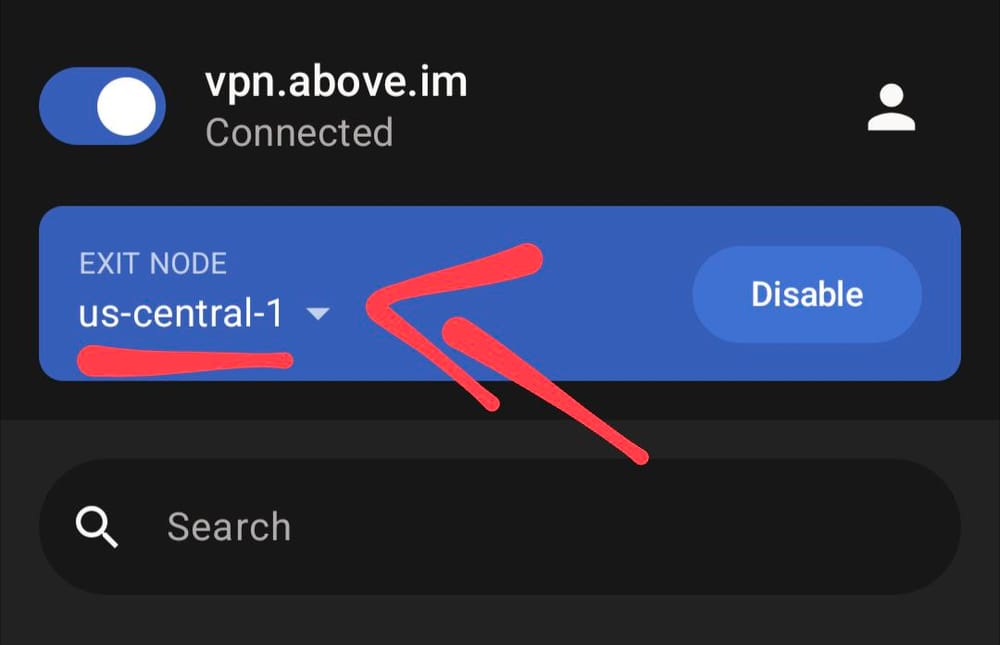
Step 12. You are now connected to the VPN!
Note: to quickly check the status of the Above VPN, swipe down from the very top to reveal the notifications.
Look for Above VPN - it should say 'Connected'
You can also look for a small key icon towards the upper left of the screen, next to the battery / WiFi indicators, which will only show if your your VPN is running. If you only see a dot, swipe down twice to reveal the key.
Step 13. After you confirmed your VPN is on and working, you can re-enable 'Block connections without VPN'
This will be in:
Settings > Network & Internet > VPN > gear ⚙️ icon next to Above VPN > toggle ON the lower switch 'Block connections without VPN'
Step 14. You will need to re-login to Above VPN once a month.
When re-authenticating, remember to toggle OFF 'Block connections without VPN' to be able to log in.
To log in again, start from Step 8. of this guide - it may skip you ahead several steps automatically.
Preparation: Setting up the Above F-Droid Repo
In this section we'll add the Above Repo to F-Droid. We'll show 3 different methods to do this.
Method A - Open link on Above Phone
Here is the link for the Above Repo:
Full content of the hyperlink:
https://fdroid.link/#https://apps.abovephone.com/repo?fingerprint=F83047291DC1246C56CCE377A44696D464D4C10D3D81E029CED2F3E7FB2D3009
You can click this link directly on your Above Phone and it should open in F-Droid and ask you to add the repository.
Tap the blue ADD REPOSITORY button - you'll be redirected to a list of apps in our repository
Method B - Add link via QR code scan
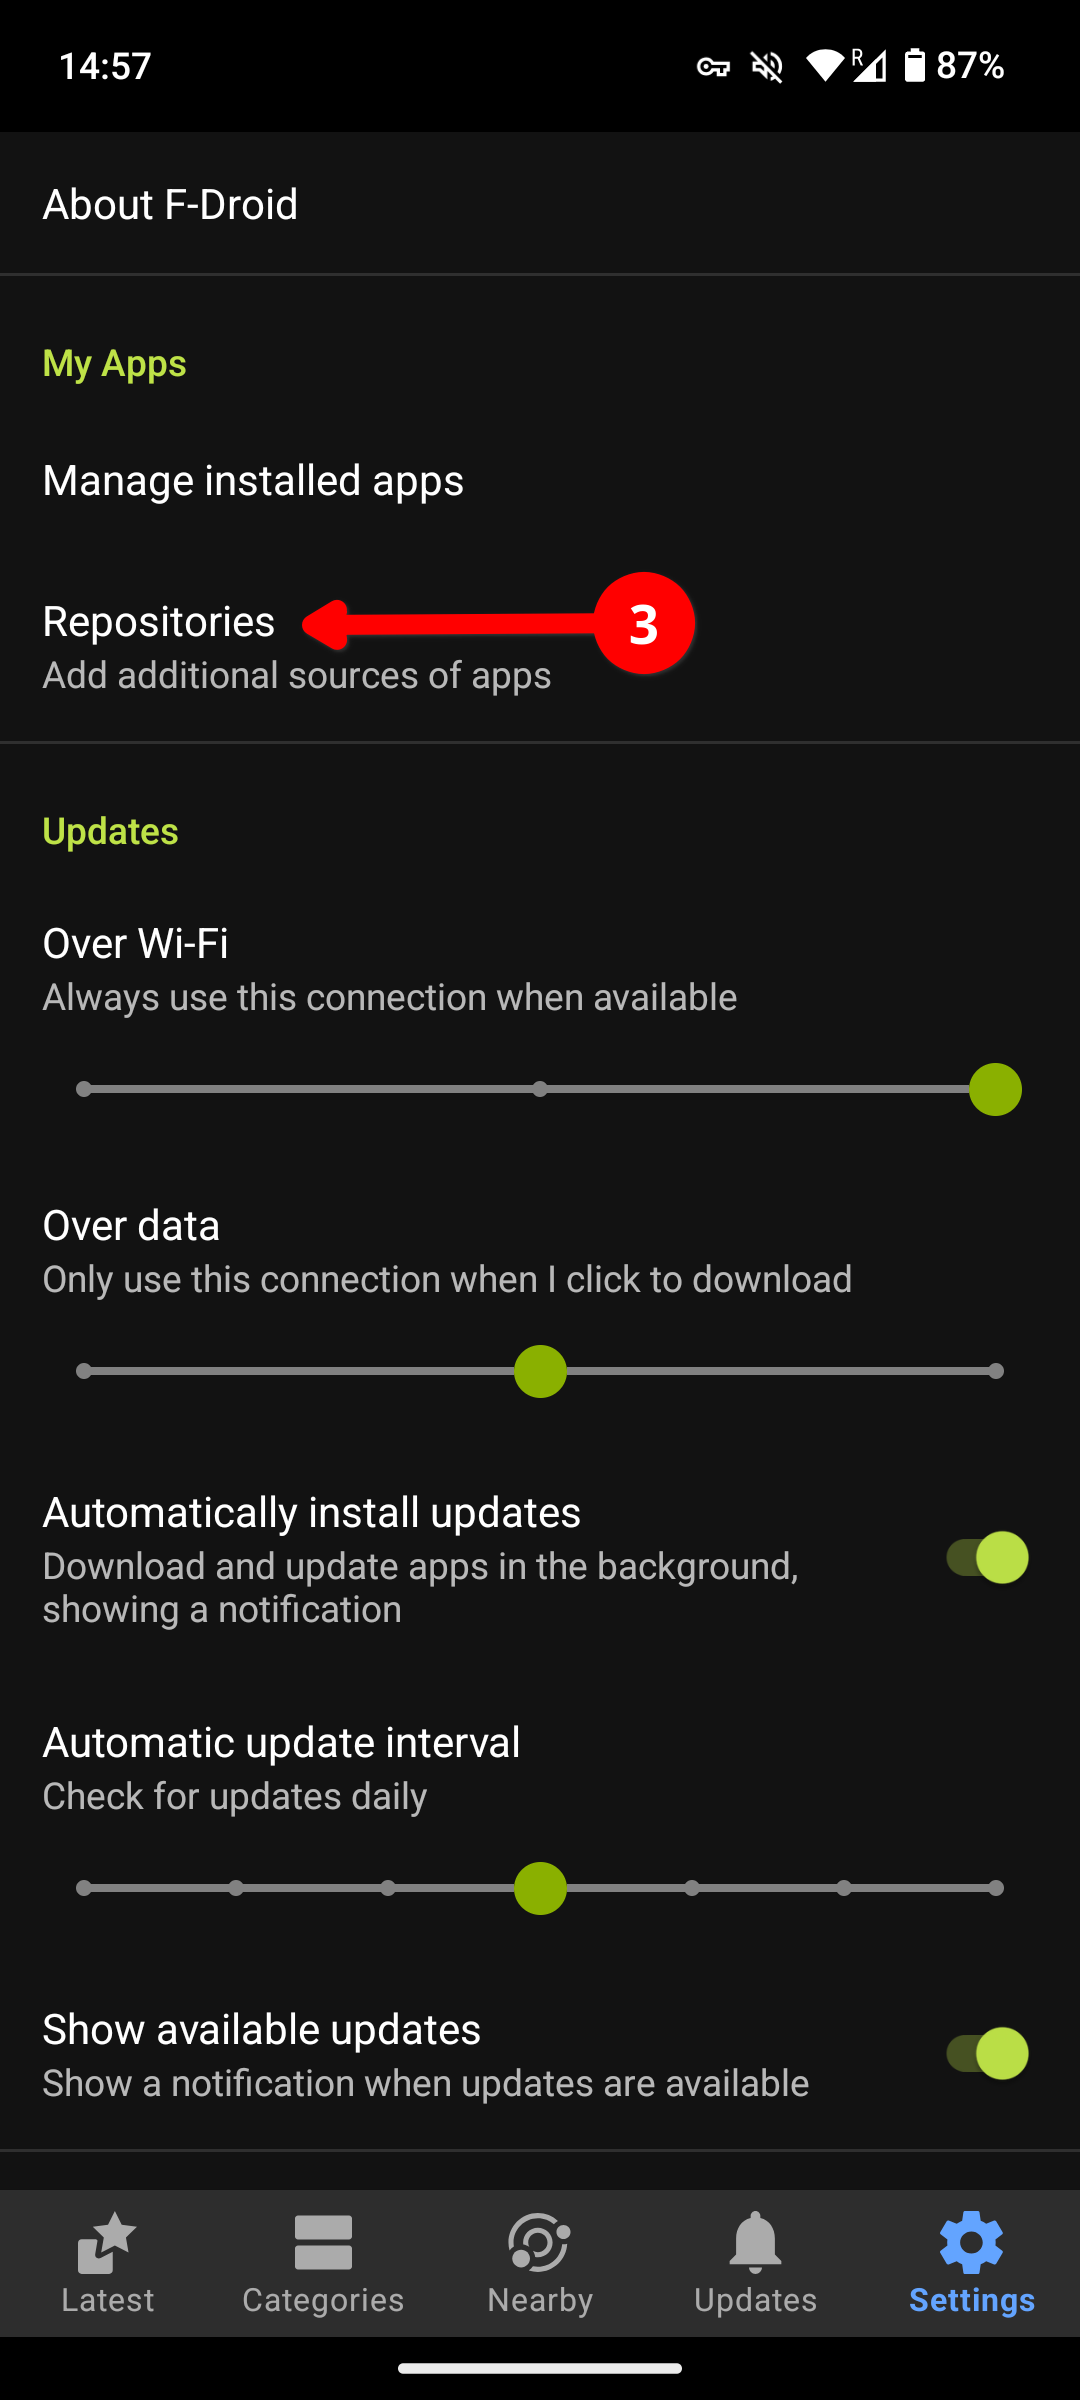
Step 1. Start from the F-Droid homepage
Step 2. Tap on the "⚙️ Settings" icon (in the lower-right)
Step 3. Tap on Repositories (3rd from the top)
Step 4. Tap the green ➕ circle (in the lower-right)
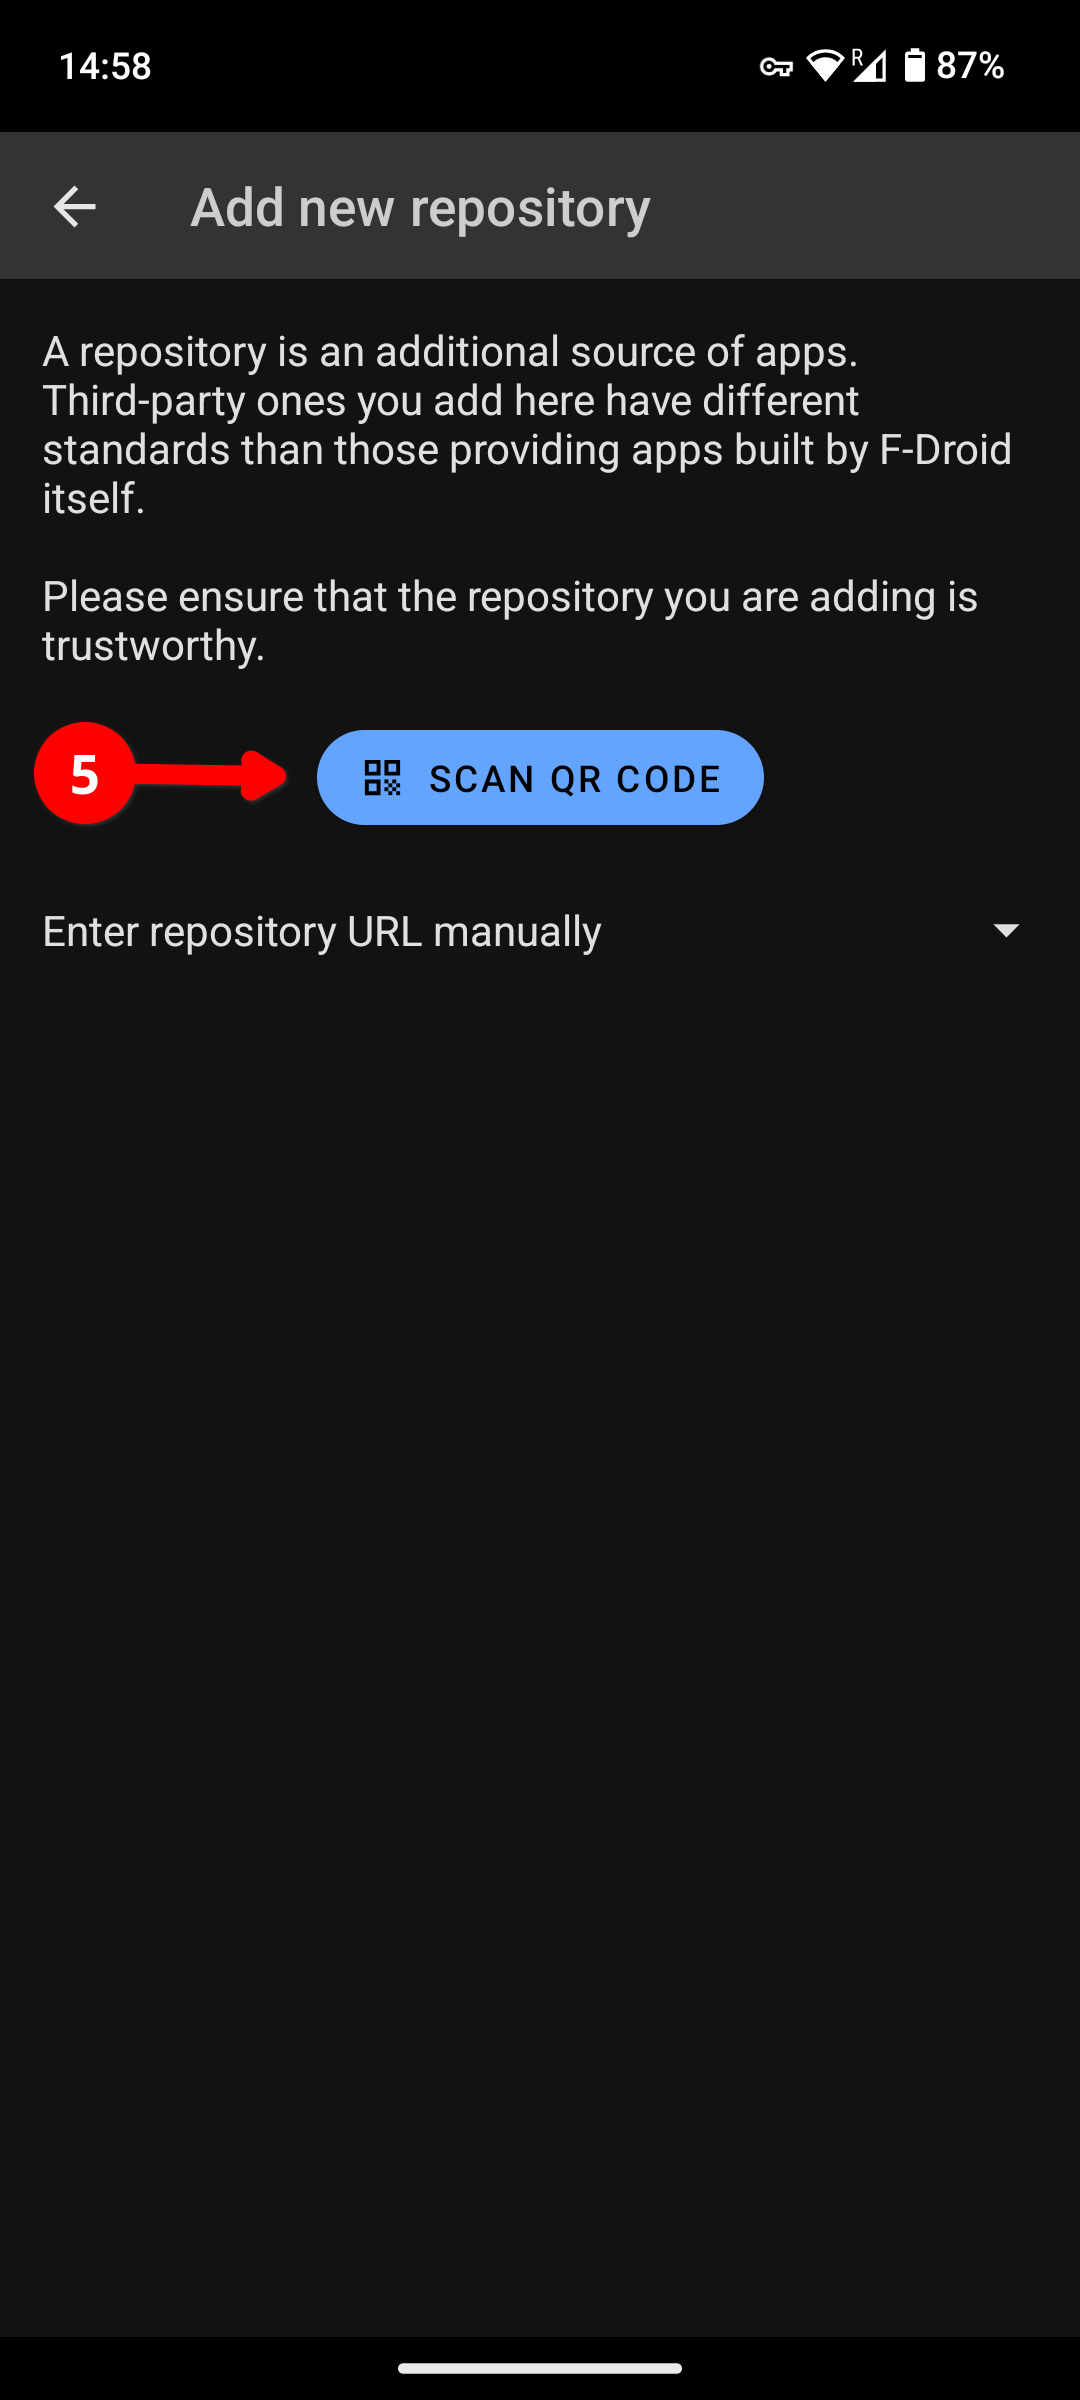
Step 5. Tap the blue SCAN QR CODE button
Step 6. Point your phone at the QR code below
(hint: zoom in by pressing the Ctrl key and the (+) key together on your keyboard)

Step 7. Tap the blue ADD REPOSITORY button - you'll be redirected to a list of apps in our repository

Step 8. Select "Above VPN" from the list

Step 9. Tap on the blue INSTALL button
Step 10. Follow the prompts as you would with any other F-Droid app.
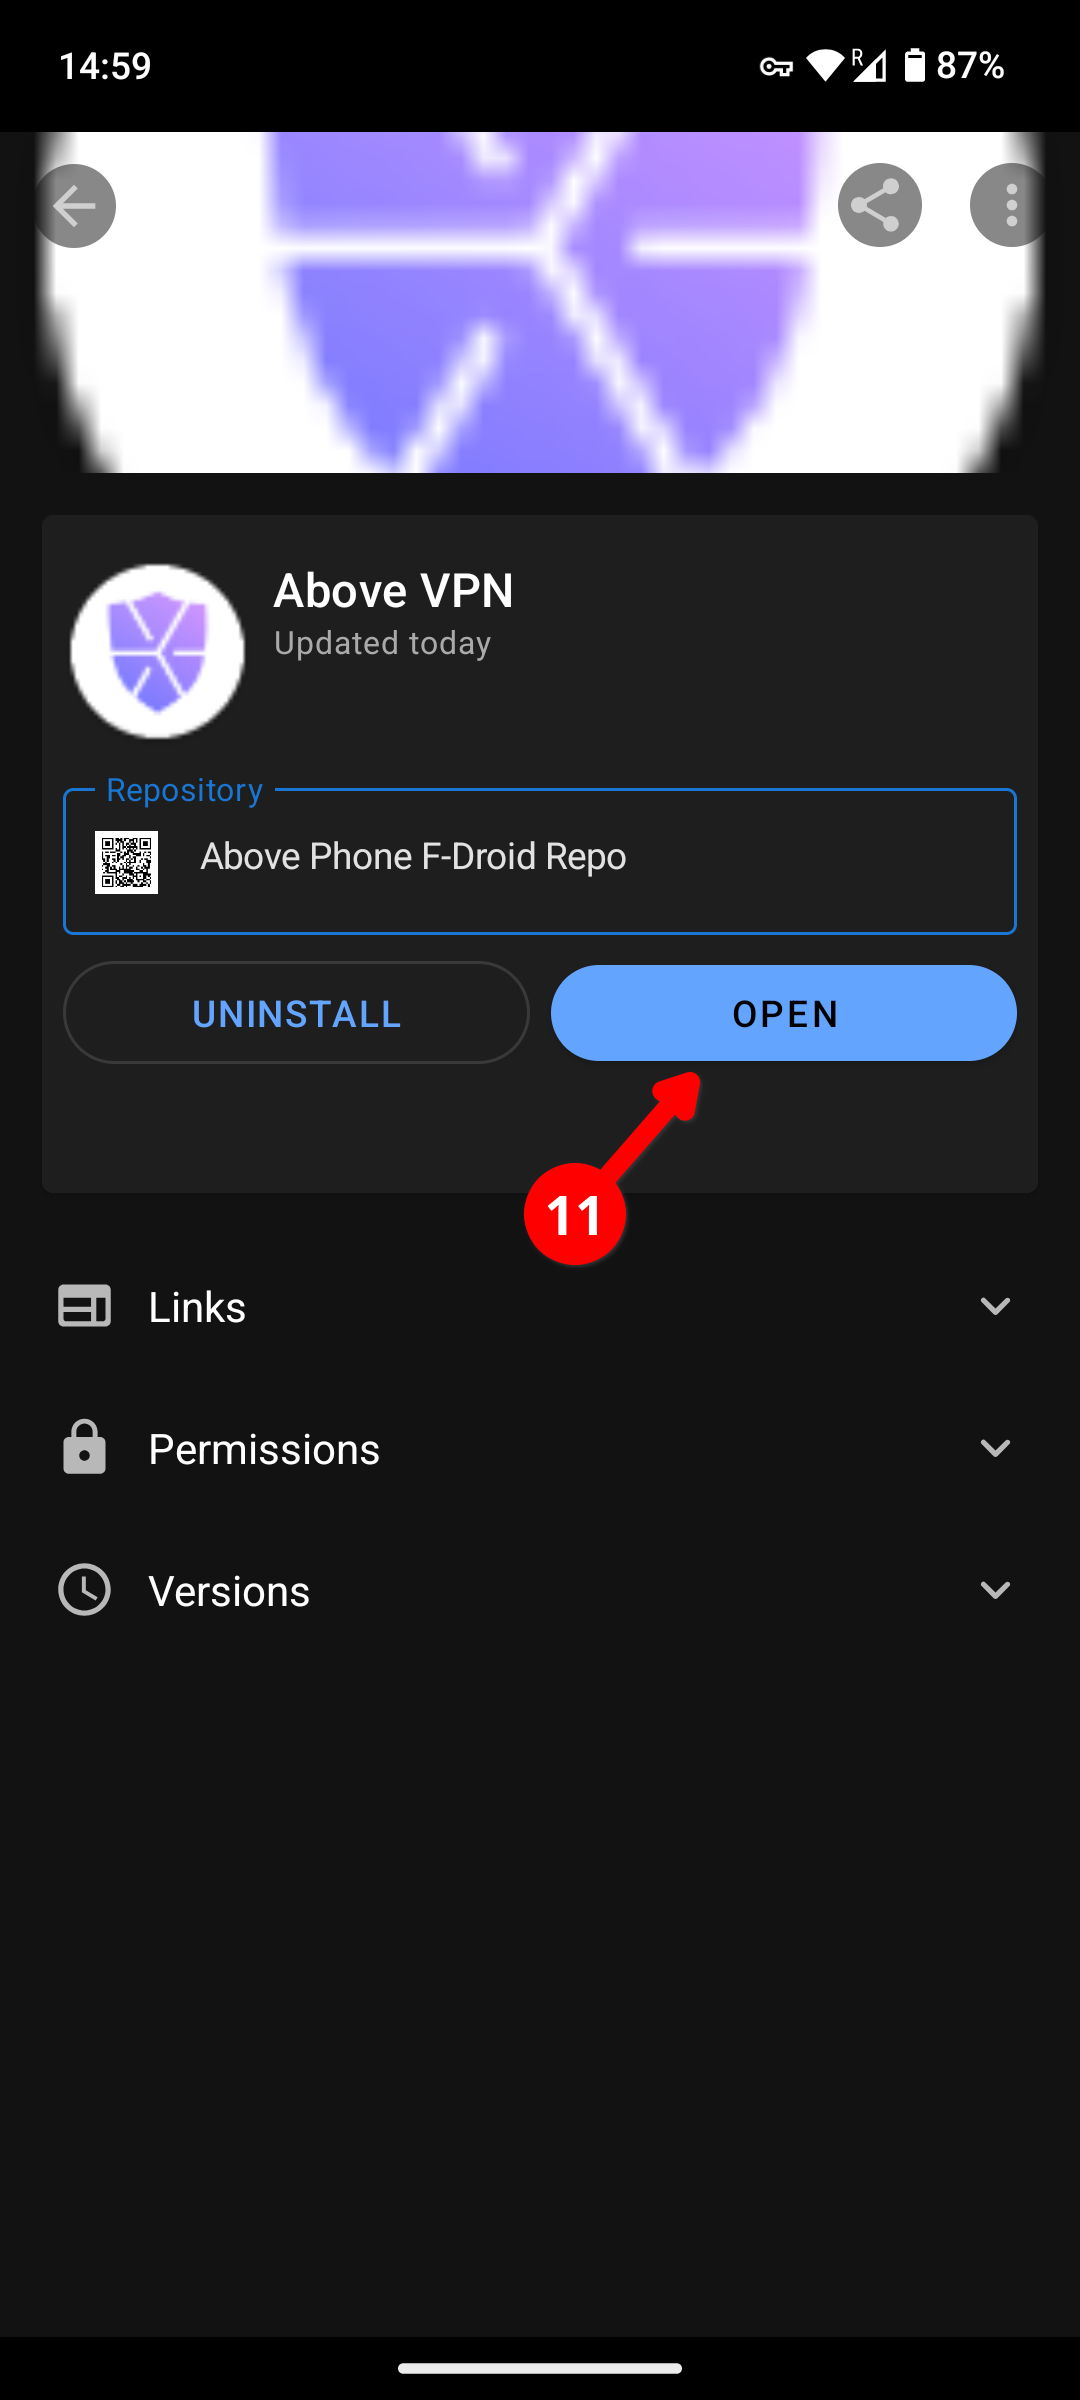
Step 11. Finally, tap the blue OPEN button, and jump to the "Using Above VPN" section of this guide
Now, after uninstalling your old VPN apps, setting up the Above repository and installing the Above VPN app, please scroll up all the way for the instructions to set it up and use it!
Method C - Manually adding URL
To add the repository and install Above VPN without scanning a QR code, follow the steps below.
Step 1. Start from the F-Droid homepage
Step 2. Tap on the "⚙️ Settings" icon (in the lower-right)
Step 3. Tap on Repositories (3rd from the top)
Step 4. Tap the green ➕ circle (in the lower-right)
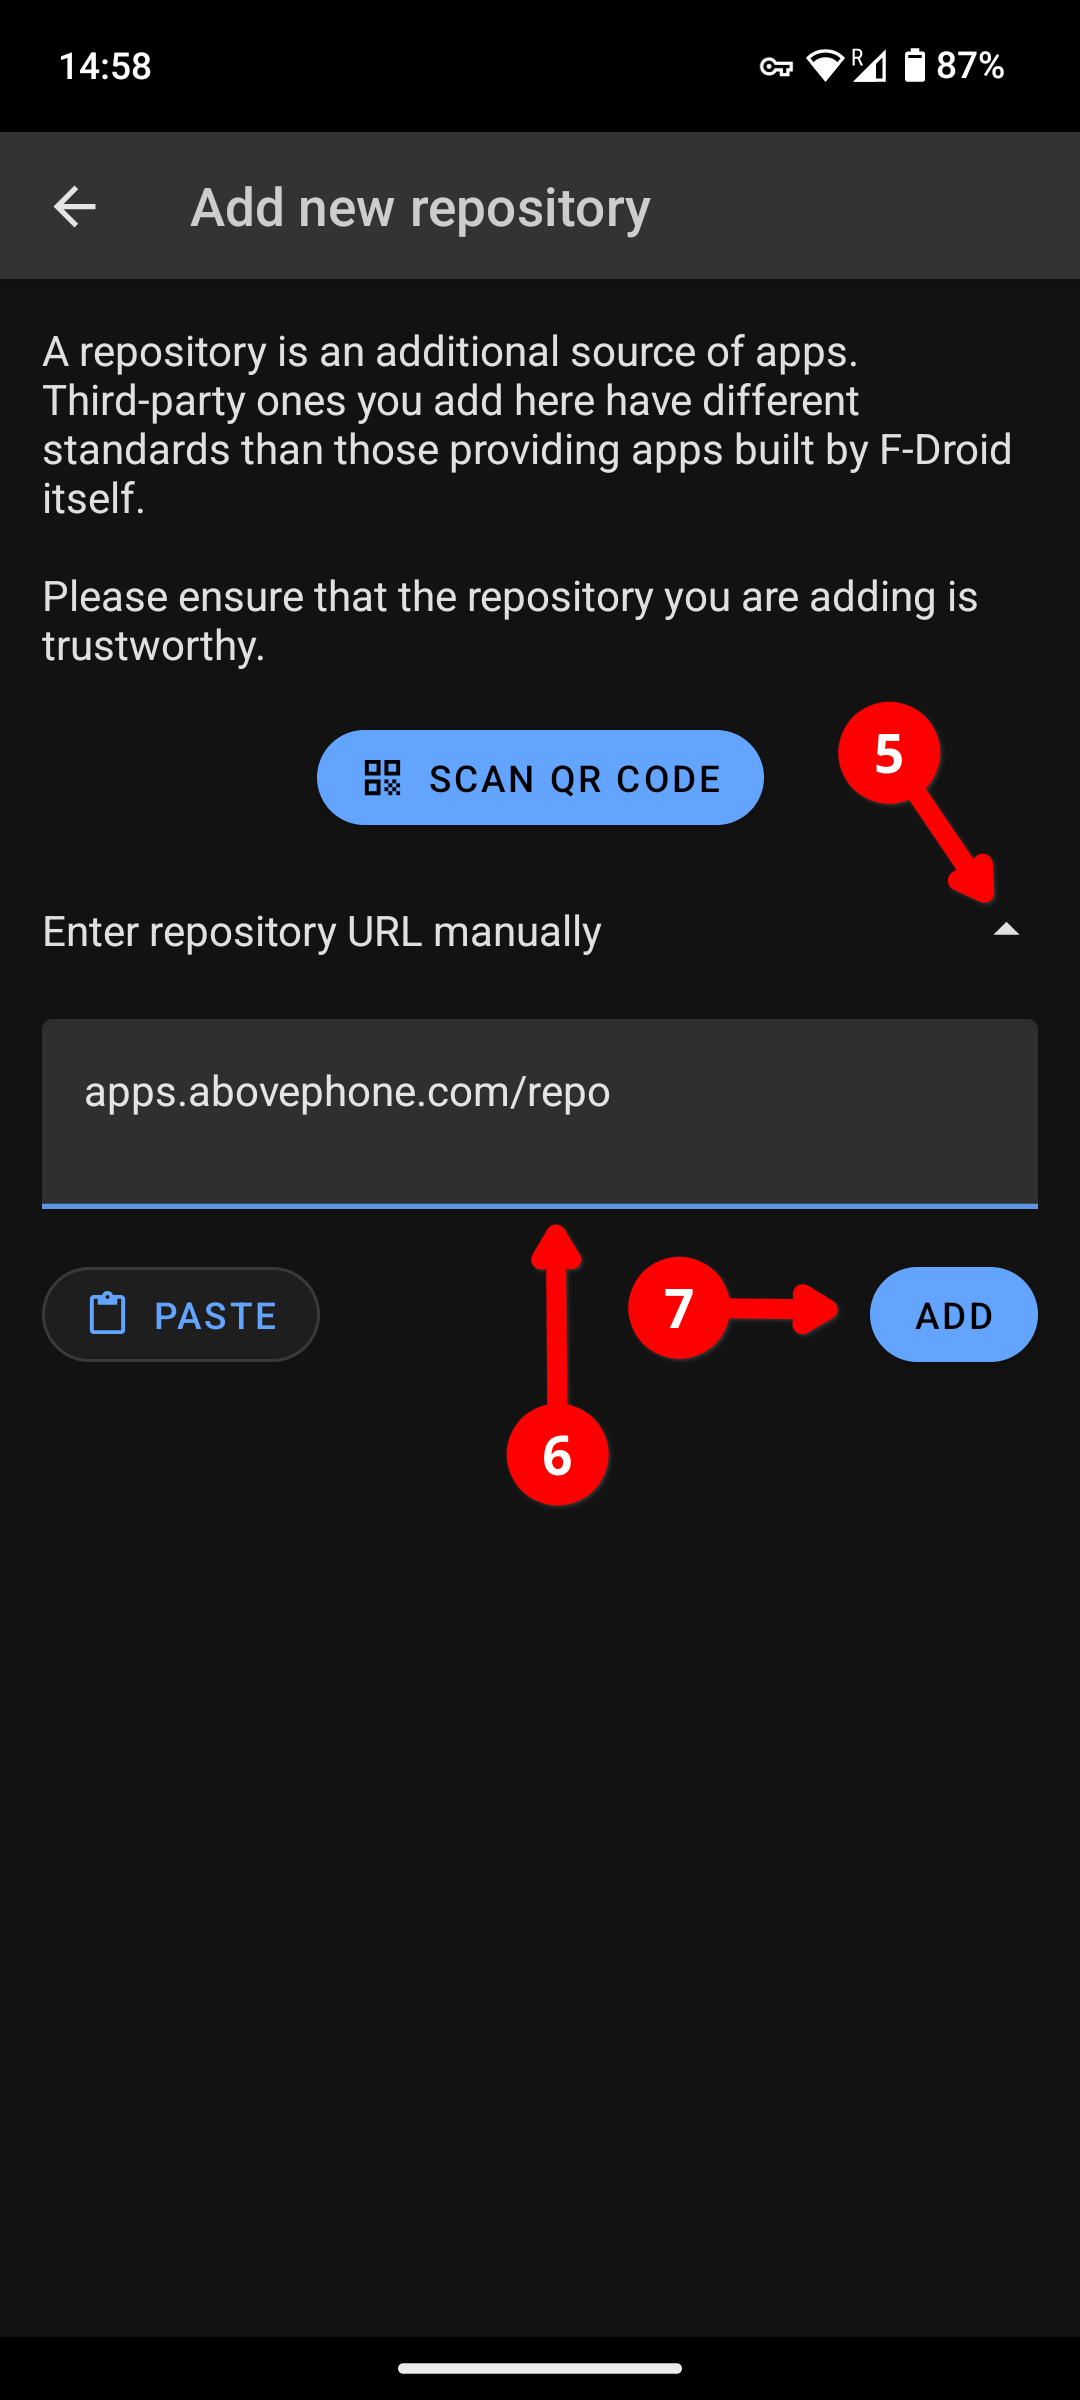
Step 5. Below the blue button, expand the 'Enter repository URL manually' section.
Step 6. In the box type: apps.abovephone.com/repo
Note: Be careful of autocorrect changes your keyboard would make!
Some keyboards automatically separate 'abovephone' to 'above phone'
Step 7. Tap the ADD button
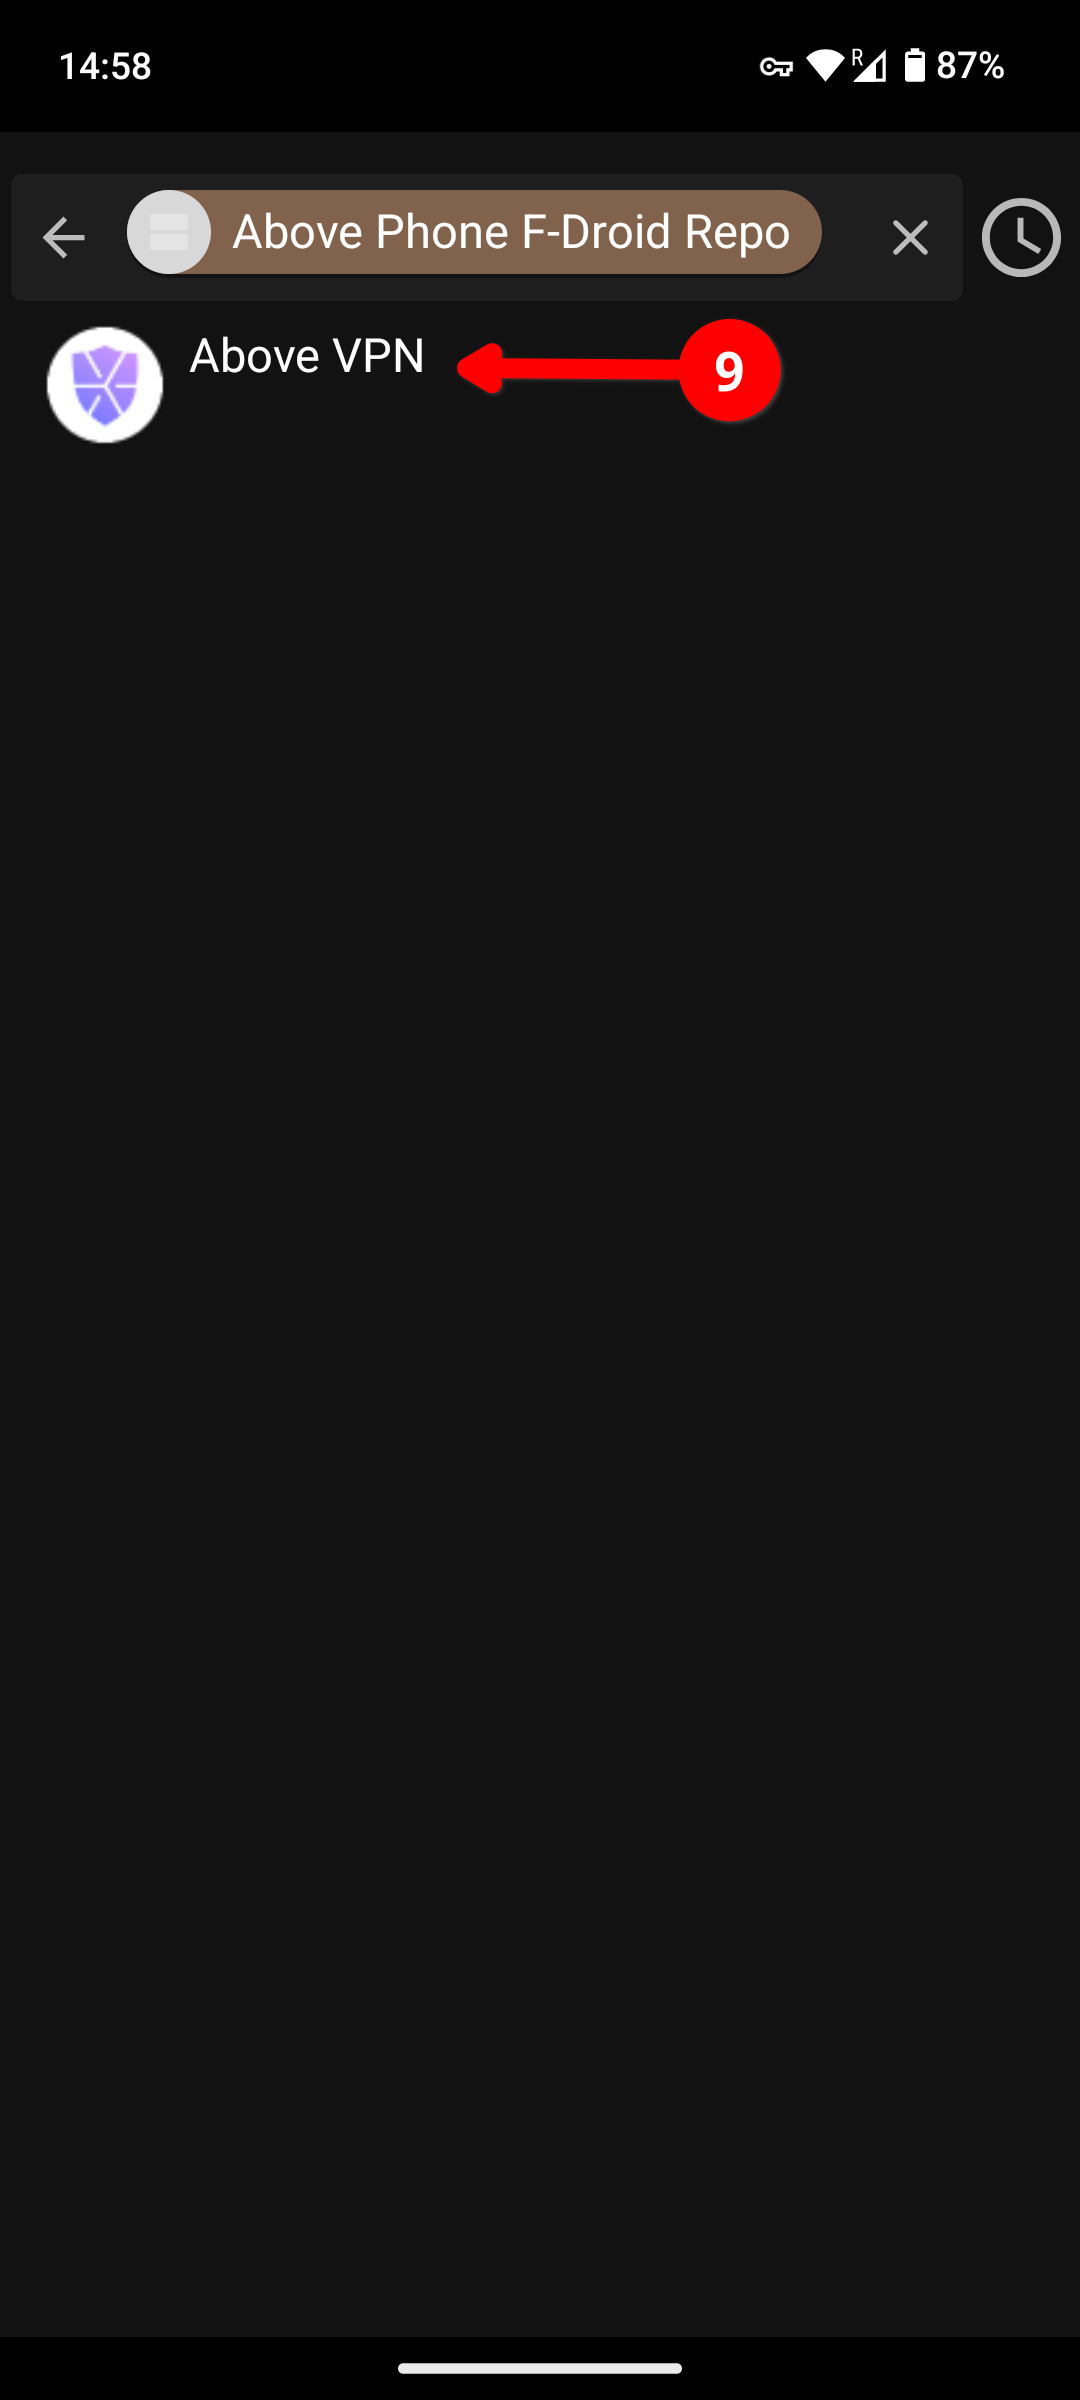
Step 8. Tap the blue ADD REPOSITORY button - you'll be redirected to a list of apps in our repository
Step 9. Select "Above VPN" from the list
Step 10. Tap the blue INSTALL button
Step 11. Follow the prompts as you would with any other F-Droid app.
Step 12. Finally, tap the blue OPEN button, and continue to the "Using Above VPN" section of this guide.

For Above Phones prior to 2025:
Uninstalling Tailscale / Wireguard
This step is only relevant if you have the original Tailscale app installed. If you bought your phone after November 2024, we already did these steps for you and you can skip to the next section.
Note: If you bought your Above Phone back in 2022 or 2023 and still have the Wireguard app installed, it is recommended to uninstall that app, like shown here with Tailscale.
You can uninstall Tailscale directly from its 'App info' section, as shown in the tutorial video.
To uninstall it via F-Droid, follow these steps:
Step 1. Open the F-Droid app
Step 2. Tap the green 🔍 circle (in the lower-right)
Step 3. tap on the Search field at the top and type: Tailscale
Step 4. Tap the UNINSTALL button
Step 5. Tap OK when prompted
Step 6. Return to the F-Droid homepage
Now, after uninstalling your old VPN apps, setting up the Above repository and installing the Above VPN app, please scroll up all the way for the instructions to set it up and use it!